
Behringer DEQ-2496 Initial Setup |
| (For the original "version 1" of the hardware for earlier DEQ-2496) (For the new "version 2" of the hardware for later DEQ-2496) eSSB Hi Fi Setup Using the Behringer DEQ-2496 Mastering Processor 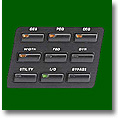 The Behringer DEQ-2496
is a multipurpose "Mastering" processor that gives excellent control over vocal dynamics, EQ tailoring, downward
expansion, and more. It's "Dynamic EQ" section is a much more elegant and precise way of performing multi-band compresson than
what an actual multi-band compressor can do. If you need the ultimate in EQ and dynamic processing for Mid-Fi to Hi-Fi eSSB and/or AM audio,
then the DEQ2496 is a jewel for the price. The Behringer DEQ-2496
is a multipurpose "Mastering" processor that gives excellent control over vocal dynamics, EQ tailoring, downward
expansion, and more. It's "Dynamic EQ" section is a much more elegant and precise way of performing multi-band compresson than
what an actual multi-band compressor can do. If you need the ultimate in EQ and dynamic processing for Mid-Fi to Hi-Fi eSSB and/or AM audio,
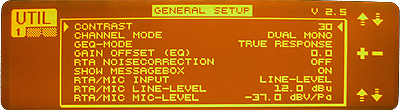
then the DEQ2496 is a jewel for the price. The menu system is very rich and takes a little time to master. This page was developed to assist in initial setup of the 2496. I hope that it is not too painful of an experience. I tried to keep it as organized as possible. Power On and Software Version Check The first thing we should do is check the software version of the 2496. This is done by pressing the "UTILITY" button. The version is reported in the upper right hand corner of the display window. Version 2.5 is the latest software revision by Behringer and includes a few bug fixes as well as a few more variable functions. If your version is below this, consider downloading the latest software version and downloading the "Midi-Ox" midi control program used to transfer the software information from your computer to the 2496. Instructions on how update the 2496 via a midi transfer is available on the "DEQ2496-upgrade" section on the bottom of this page. Menus and Setup The main menus are accessed by pressing one of the 9 buttons on the right side of the 2496. First, you should set the rear-panel "MAX" switch to a level of +22 dBu. (Level button pressed "IN") This establishes an extra +10dBu of maximum gain capability and will allow a little more "headroom" for signal peaks. UTILITY Menu Pages 1, 2 & 3 Pressing the UTILITY button will display one of three "PAGES" of menus. Select Page 1 (GENERAL SETUP) by pressing the "PAGE" button just to the top-left of the main display. Adjust the contrast of the display by first selecting CONTRAST by rotating the small top knob marked PUSH / TURN. A little arrow to the left of the display will move as you rotate the knob. Once the arrow is pointing to CONTRAST, change it's value by turning the big knob. Select what works best for you. Following the same procedures for selection and parameter values, make sure that values indicated on pages 1, 2 and 3 of the UTIL menu are as shown below:
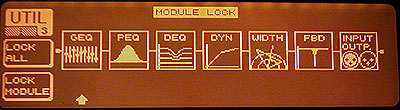
You will want to make sure that the "CHANNEL MODE" is set to "DUAL MONO". Since we will be working with a MONO signal, "DUAL MONO" will allow independant Right/Left processing settings. We can then use each channel for a different purpose, like for example, using the Left channel for our transmiter audio and the Right channel for our receiver audio. It's like having two MONO DEQ2496's in one! BYPASS Menu The "Bypass" menu allows you to select which modules you will or will not be using. I would suggest bypassing the modules you will not be using. You do this by selecting the module using the big knob, and then pushing the big knob resulting in a module that is "X'ed" out. If you will only be using the Left channel, you can bypass the entire right channel by pressing the small bottom knob in once. You will then see a straight line through everything in the right channel indicating that it's hardwire bypassed. I chose to bypass the left channel "GEQ" module since I ill not really need this if the PEQ module is properly set up. On the right channel, I have disabled all modules, accept for the "GEQ", which I use for transmitter monitoring purposes. See the illustration below:
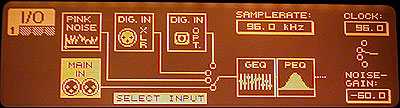
I/O Menu Page 1 The "I/O" menu (Input / Output) allows you to configure which inputs and outputs you will be using and also configures the RTA (Real Time Analyzer) input source. The only menu we need to be concerned about is on Page 1. The INPUT source should be set to "MAIN IN", the clock should be set to "96.0" and the "GAIN" should be set to "-60.0". See the illustration below:
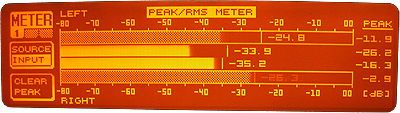
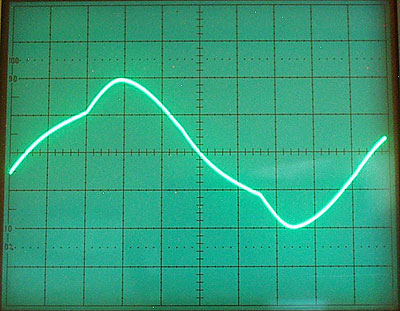
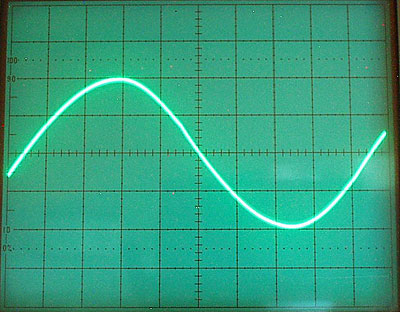
Initial Preamp Levels Feeding the DEQ2496 Adjust your microphone preamp output control so that the 2496 Left input "Peak" level (top shaded scale) reads about -25dB in real-time as you are speaking normally. Don't worry if your input meter reads up to -10dB on voice peaks as this is normal. You are now ready to continue with the DEQ2496 settings. Behringer DEQ2496 Universal Critical Timing and DEQ Parameters The following universal parameters (useful for all applications) were derived from extensive testing by Tyler, KA0KA, using his function generator and an oscilloscope to determine the best timing and frequency/BW parameters for minimal distortion of a sign wave source at the output of the DEQ2496. In addition, the DEQ center frequencies, and their respective bandwidths, have been optimized to simulate a true multi-band compressor covering the entire 20Hz~20kHz audio spectrum, even though the higher frequencies above about 10kHz are irrelevant in our application. To show an example of incorrect timing parameters vs. corrected timing parameters, see the following scope patterns: Incorrect Behringer DEQ2496 DEQ/DYN Timing Parameters The Behringer DEQ2496 optimal settings are as follows: DYN SECTION The DYN section gives you two options; Downward expansion or compression, but not both at the same time, unfortunately. If you already have compression available somewhere else separate from the DEQ2496, or you just do not ave any need for traditional compression (beyond the DEQ section), then use the downward expander. If, on the other hand, you find that you need the compression beyond the DEQ dynamic control, then use the compressor. I have used them both. When I was operating the Kenwood TS-850/DSP100, I needed the compressor to prevent high frequency distortion as a result of the aggressive high frequency EQing I was applying. However, with my current setup using the Apache Labs Anan 7000dle, I find that I no longer need the compressor to control high frequency tearing. This is because the Anan is much more flat at higher frequencies and requires much less aggressive eqing. As a result, high frequency distortion does not occur and no compression is needed up there. NOTES: The compressor and downward expander sections in the DEQ2496 precede the DEQ section. Therefore, if any changes are made in the DYN section, the DEQ section must be re-calibrated! IMPORTANT: You may find that the numeric values indicated in the following menu's cannot be found on your DEQ2496. This is because you are using the "Coarse" mode on the knob that selects the values. Simply press the knob IN and a finer resolution will become available. Downward Expander Section (If not using Compressor) DYN Page 1 (EXPA Hilighlighted - Black text on Orange background) Ratio: 1:1.6 DYN Page 2 Attack: 13.18 ms Release: 49.9 ms DYN Page 1 again With NO talking, Adjust "Threshold" so that the "LR GAIN" level reaches -15 When talking, make sure that the "LR GAIN" level recovers to 0. (My "Threshold" control ends up at -45dB to make both happen) Compressor Section (If not using Downward Expander) DYN Page 1 (COMP Highlighted - Black text on Orange background) Ratio: 1:2 (Recommended for soft leveling / mild compression) (user's preference *) *Dynamic Ratio is user dependent on program material and preference… Ratios above 20:1 can be classified as soft to hard limiting Ratios of 4:1 to 6:1 can be classified as soft to hard compression Ratios of 2:1 or less can be classified as soft leveling to mild compression DYN Page 2 Attack: 2.77 ms Knee: 0 (hard) (user's preference) Release: 85.6 ms DYN Page 1 again Make an "EEEEE" sound with your voice and adjust the "Threshold" so that the "LR GAIN" level just starts to show a slight downward gain reduction (about -1dB). "SSSing" frequencies should show about -7dB to -10dB of attenuation. (My "Threshold" control ends up at -45dB to make this happen) When adjusted in the manner described above, the compressed high frequencies will allow about another 10dB of headroom in the DEQ #3 section with high frequency dynamic attenuation. This is because the DYN section precedes the DEQ section, so high frequency compression will occur before any DEQ processing. This results in excellent high frequency dynamic control! As an added benefit, 1dB of midrange compression will occur during normal speech and increase at speech levels above normal, while compressing the high frequencies much more aggressively when needed. (This is because we are EQing much more aggressively at high frequencies and using a mono-band compressor here.) Limiter Section DYN Page 2 (LIMIT MENU) Hold: 30.6 ms Threshold: Set to where you want your output peak to be"Clipped" (-3dB recommended) Release: 304.2 ms DEQ Section DEQ #1 DEQ Page 1, DEQ #1 M-Gain: -15dB Ratio: 1:100 DEQ Page 2, DEQ #1 Attack: 2.77ms Release: 105.4ms DEQ Page 3, DEQ #1 Mode: BP Frequency: 40.4 BW (OCT): 4 DEQ #2 DEQ Page 1, DEQ #2 M-Gain: -15dB Ratio: 1:100 DEQ Page 2, DEQ #2 Attack: 61.59ms Release: 50.9ms DEQ Page 3, DEQ #2 Mode: BP Frequency: 408 BW (OCT): 5 DEQ #3 DEQ Page 1, DEQ #3 M-Gain: -15dB Threshold: (Determined with your voice and levels) Ratio: 1:100 DEQ Page 2, DEQ #3 Attack: .30ms Threshold: (Determined with your voice and levels) Release: 20ms DEQ Page 3, DEQ #3 Mode: BP Frequency: 10023 BW (OCT): 5 After entering all of the proper parameters, as given above, the individual thresholds for DEQ NO #1 and DEQ
NO #2 should be reset to -5dB of gain reduction while a constant user program is feed into mic. (For example a solid ahhhhh...)
(See example below)
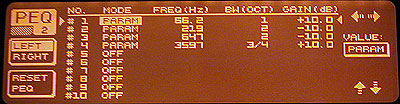
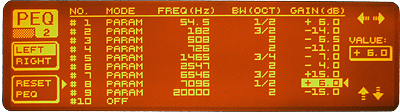
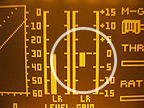 Set DEQ NO #3 to the minimal threshold that eliminates any high frequency distortion. After this, further adjust the DEQ #3 threshold to a higher negative number for any "SSSing" problem that may be causing a "Splashy" sound or excessive sibilance in the very high frequencies. Lowering the DEQ #3 threshold effectively accomplishes "De-Essing" if needed. Note that any time you readjust your signal levels, re-EQ, or change compression settings anywhere in the chain prior to the DEQ2496, you MUST recalibrate the DEQ thresholds for all three bands as described above. The resulting frequency / bandwidth distribution of above parameters: 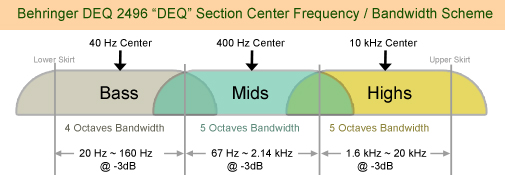 Note: These three bands control amplitude dynamics, NOT EQing, and is therefore in effect performing independent "Multi-Band" compression. Even though "Dynamic EQing" uses a different approach than "Multi-Band Compression", the same resulting dynamic control is achieved. PEQ (Parametric Equalizer) Pages 1 & 2 Your PEQ settings will vary depending on several factors: Transceiver bandwidth, the microphone being used, your voice and the desired audio you want to produce. In the generic example displayed below, I have adjusted for a TX bandwidth of about 3 to 4 kHz using a dynamic microphone. If you will be using a condenser microphone, do not add as much low frequency boost because a condenser will have about 6~10dB more of low frequency amplitude available. The following PEQ filters are for example purposes ONLY! eSSB Settings using a "Dynamic" microphone (3~4kHz Bandwidth) If your bandwidth, for example, will be 6kHz or beyond, then the DEQ will look significantly different. See the example below where I have settings for a 6kHz + bandwidth: eSSB Settings using a "Dynamic" microphone (6kHz + Bandwidth) NOTES: Behringer DEQ-2496 Software Upgrade Procedure
WARNINGS & DISCLAIMER Be aware that if the software update fails for whatever reason, your 2496 may end up nonfunctional until the update is successfully installed. I assume no responsibility for failed updates to the DEQ-2496, but I will assist you anyway I can until all options have been exhausted. CHECK YOUR FIRMWARE VERSION FIRST! The first thing you should do is check the software version of the 2496. This is done by pressing the "UTILITY" button. The version is reported in the upper right hand corner of the display window. Write down the version; It will be either 1.x or 2.x, where "x" is a number from 1 to 5. ONLY UPGRADE IF YOU NEED TO! It is very important that you upgrade ONLY if you need to, and if so, download the correct version for your unit... (either version 1 original processor or version 2 newer processor). Version 1.4 is the latest software revision of the original units (Version 1 processor) and includes a few bug fixes as well as a few more variable functions. Version 2.5 is the latest software revision of the newer units (Version 2 processor). If you have either one of these versions, YOU DO NOT NEED THE UPDRADE! Step 1:
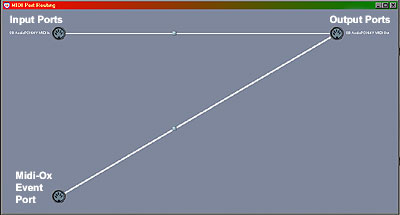
If you do NOT see a connecting line from the "Output Port" (right) to the "MIDI-OX
Event Port" (lower left) or something similar, then right-click the Output Port connector and then click: "Connect
Output Port". A line should appear connecting the two as shown above. Also make sure that the top two connectors
are labeled MIDI Input and MIDI Output.
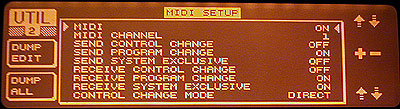
Turn the DEQ 2496 OFF. Press and hold the "UTILITY" button while turning ON the 2496. The 2496 should display a message informing you that it is waiting for the upgrade transfer. Step 7: Execute the transfer. In the MIDI-OX program, select Actions > Send > SysEx File... Navigate to the directory ("Look In" dialog box) where you downloaded and saved your ".syx" file and double-click that file. You should see a message on the 2496 display indicating the transfer progress in pages or "blocks" uploaded. This process will take about 5 minutes to complete. When it is completed, the 2496 main window will say: "Please Recycle". This is a fancy way of saying, "Turn off the power and then turn it back on again". If everything was successful, The UTIL menu page 1 should indicate v1.4 in the upper right hand corner of the screen. Congratulations... Your done! If you did NOT have success, then please see the troubleshooting section that follows... Troubleshooting Possible Problems: Even though I had no problems using the above outlined procedure, others have reported problems getting the 2496 to upgrade properly. Below is a checklist of possible solutions. 1) Check the buffer rate by clicking: "Options" > "Configure Buffers..." Set the "Low Level Input Buffers" and "Low Level Output Buffers" to a "Size" of "64". I guess Behringer recommends this. You can experiment with different buffer sizes. I use 256 on mine. 2) Remember to connect ONLY the MIDI cable OUTPUT to the DEQ-2496 MIDI INPUT. Leave the 2496 MIDI OUTPUT disconnected! 3) Try using the opposite MIDI DIN cable connector feeding the 2496 input. I had one person report that his cables were marked the opposite as cables made by most other manufacturers, so it is worth a try. 4) It is possible, that your sound card may not be MIDI compatible. If you can not get step 4 above configured, then you may need to try it on another computer or sound card. 5) If you have a computer with an embedded sound card. on the motherboard, the MIDI ports may be disabled in your CMOS setup. Reboot your computer and bring up the CMOS setup (F1 or ESC usually) and turn ON the MIDI port. 6) Bill Winkis Jr., KC4PE reported that the following worked for him: (a) Execute the MIDI transfer to the 2496 even though you may not see anything happening. (b) Turn the Power off on the 2496 (c) Turn the Power back on and quickly press the "UTILITY" button twice and then watch the display... (I suspect that pressing and holding the "UTILITY" button while pressing the POWER button ON will accomplish the same thing.) If the transfer worked, you will see the pages on the 2496 update very quickly and your done! If it still did not work, then read the Behringer suggestions that follow... 7) USB to MIDI Converters: Paul Christensen, W9AC had a unique problem updating his DEQ2496. He was using a Yamaha USB to Midi converter since he did not have a MIDI port in his computer. The transfer did not work until he increased both of his "Low Level Input / Output Buffer" sizes higher than 256 to a value of 1024. (In MIDI-OX, this can be done by clicking: "Options > Configure Buffers..." and then setting both values to 1024 Buffers.) He reports that once the buffer was set to 1024, the transfer went very quick and was successful. Thanks Paul for this information! 8) Jim Henderson reports that he had to change the buffer delay in the SysEx transfer options to 120 mS. To do this, click: "View" > "SysEx..." > "SysEx" > "Configure..." Then make sure the "Delay After F7:" is checked and set the "MilliSeconds Between Buffers" to a value of "120 mS". (Note: When transferring properly, the DEQ main screen will display a series of small squares. If you see anything else, a value is incorrect. Make sure that the "Output Buffer Size" is "1024", and that the "Delay" is set to "120 mS".) The following are Behringer's suggestions for upgrading and troubleshooting the DEQ2496 software upgrade: Behringer DEQ2496 Software Upgrade Recommendations: The DEQ2496 software upgrade is done via MIDI and you will need a software package which can transfer Sys Ex files. (Also ensure that the drivers for the MIDI device are installed correctly). 1) Download the DEQ2496_V1.4 Sys Ex file to your PC. (eg.- after download, save zip file to desktop - extract to desktop) 2) Connect the DEQ2496 "MIDI in" to the PC interface "MIDI out". 3) Select "utilities" menu in DEQ2496 and go to page 2. Turn everything off except "receive Sys Ex dump" 4) Open you MIDI sequencer software (or a MIDI tool like MIDI Ox) and select activity "send Sys Ex file" You should be presented with some form of browser window to locate the correct sys ex file. 5) Hit "OK" to confirm. The DEQ2496 display will show "overwriting block xy / " and a file transfer progress window is displayed by the pc. After a while... the update is complete. 6) To initiate the new firmware restart the DEQ2496 (I performed a complete reset, but this shouldn't be necessary). Behringer DEQ2496 Software Upgrade Troubleshooting Data: 1) Make sure you only have one MIDI cable connected from the output of MIDI OX (PC) to the DEQ MIDI IN. 2) Make sure you do not have any "filters" (e.g. "running status", "sysex", etc.) set on your MIDI interface or MIDI OX (default on MIDI OX should be fine). Also make sure no "midi time stamping" is being used. 3) If the operation is not completed after ensuring the above steps, it may be necessary to adjust the buffer settings in MIDI OX, by going to Options, and choosing Configuration Buffers. This may require some experimentation to find the right settings... If all else fails, contact Behringer customer support at: (425) 672-0816. If you have solved a MIDI transfer problem that was not mentioned on this page, please contact me with your problem and solution so that I can document it here for others. Many thanks to: KA0KA, K2WS, K4QKY, K8YK, KC4PE and Behringer for their invaluable assistance in providing solutions and their hours of troubleshooting and experimenting to arrive at them. Note: To perform a "Factory Reset" of the DEQ2496, press and hold the "COMPARE" and "MEMORY" buttons simultaneously while turning ON the DEQ2496. Have fun and may you find that "Sweet sweet sound"
you have been looking for using your DEQ 2496 !! John (NU9N)
|

| John M. Anning - NU9N e-Mail: |
Apologetics 1 | Apologetics 2 | Audio Glossary | Donate | eSSB Mods | eSSB Ready Rigs | Transmitter Settings for eSSB
File Downloads | News | Radio Connections | Transmitter Settings | Scope Your Audio | Site Map | Site Search | T-Pad Calculator