
Receive Audio Setup |
|
Introduction:
Setting Up Your Receiver Audio
The Kenwood TS-870S, TS-850S with the DSP-100 and TS-950SDX are excellent receivers for this purpose and will receive up to a 6kHz bandwidth with good flatness. Some receivers like ICOM and Yaesu can
be modified via wider receiver filters also. If you wanted to shell out the $$$, you could purchase a dedicated hi-end receiver like those made by A.O.R. For all other receivers that are NOT flat, but have sufficient bandwidth, I would
recommend a dedicated EQ (Equalizer) for this purpose. An audio equalizer could easily reshape the receive characteristic of a less than flat receiver.
You can download a simple but effective spectrum analyzer that would examine the audio output from your receiver. Such a program called Hamalyzer can be downloaded at the following URL:
http://www.hamalyzer.com/"HamAlyzer" software is $30 registered... It's a great program for the price and does multiple overlays like Spectra Plus. If you need a very elaborate spectral analyzer, Pioneer Hill Software makes an excellent program called "Spectra Plus" that can be downloaded and tried for 30 days will all
features enabled. Spectra Plus can be downloaded at following URL:
http://www.spectraplus.com/ As a bonus, Pioneer Hill Software offers its $300 Spectra Plus program to amateur radio operators at a 50% discount, lowering the price to $150. That's a great deal for this software folks!
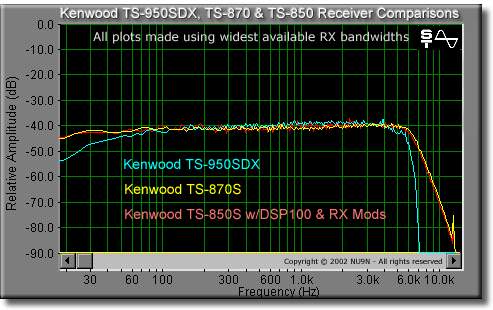
As you can see, the Kenwood TS-950SDX, TS-870S and TS-850S all receive out to about 6kHz easily! The stock 870 is a bit flatter on the low and high ends than the 950 and is identical to the the modified
850 w/DSP-100 but are otherwise very close in comparison. (Go to www.ka0ka.com for 850 mods)
For those of you who do not have a receiver with these kind of receiver properties, all is still not lost. With a modest equalizer in the receiver chain, you should be able to work with your receiver to shape it up (or down if you prefer). If you have a receiver that is only capable of 2.4kHz, you will probably only be able to EQ up to about 3.5kHz if the carrier point is set up appropriately. This brings us to another issue... "Carrier Set Point". Depending on where the carrier set point of your transceiver is adjusted, a 2.4kHz bandwidth could sound anywhere from "Bassy"
to "Tinny"! For example, if the carrier set point for a 2.4kHz filter point is adjusted at, say 300Hz on the low end of the audio spectrum, then the approximate high cutoff will result at around 2.7kHz. The audio will sound a
bit on the "Thin" side.
However, if the carrier set point on the low-end has been adjusted for 100Hz, resulting in a high-end cutoff of 2.5kHz, it will sound much richer in comparison. So, the carrier set point is important depending on what part of the audio spectrum you want the transceiver to operate in. For a 2.4kHz filter setup, I would recommend a 100Hz offset at the low end for the more pleasing (not the most articulate) sound and a richer texture. Receiver Controls The following is a list of controls to adjust for maximum receiver performance and listening naturalness: - AGC - Slow - RF Gain - S9 on meter - Bandwidth -wide as possible (I.F. Filters at widest position or disabled) (DSP at widest settings) - Noise Blanker - Off - Notch Filter - Off - VFO PLL Steps - Fine - Volume / AF - No more than 11:00 position to avoid unnecessary distortion - Slope Tuning or Shift / Width at widest positions - Use of high quality headphones or high quality external stereo amplifier with high quality speakers |
 Your
receiver setup will be critical in determining how you perceive the SSB station you are listening to. Also, at some point there will be those who will be assisting you with your TX audio via recordings. So you will at least want an accurate
way to receive audio. The perfect receiver will be able to capture a bandwidth of at least 4kHz and reproduce it with true flatness. That is, all frequencies from the receiver being relatively equal in amplitude from about 50Hz ~ 4kHz.
Your
receiver setup will be critical in determining how you perceive the SSB station you are listening to. Also, at some point there will be those who will be assisting you with your TX audio via recordings. So you will at least want an accurate
way to receive audio. The perfect receiver will be able to capture a bandwidth of at least 4kHz and reproduce it with true flatness. That is, all frequencies from the receiver being relatively equal in amplitude from about 50Hz ~ 4kHz.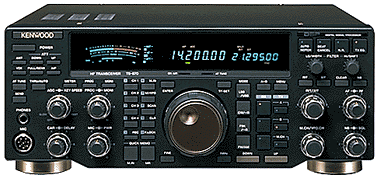
| Setting Up A Receiver Spectrum Analysis Program Click to download a trial version of either: NOTE: If you don't have a line-out jack, just use the headphone or speaker jacks of your radio. However, be careful! If you do need to use the speaker jack, first make sure to attenuate it with about 100 ohms of resistance using a resistor or pre-made pad of some kind. Also be aware that signals from some these sources can be somewhat degraded in frequency response (especially bass) because of capacitance values in these circuits. Next, you will need to build or buy a cable to interface the receiver audio output to your computer's sound card "Line In" jack. Never use the "Mic Input" jack of the computer for this. It is too sensitive for line-level signals and distortion will most likely occur. Now start your computer's audio analyzer software. Adjust your receiver so that it is receiving the widest possible SSB bandwidth. Also, turn your receivers AGC off. Then, adjust the RF GAIN so that there is no receiver overload. This is important because we do not want the AGC circuit to smooth the amplitude of different frequencies. We want the most accurate reading we can get without AGC influencing the readings. There are two ways to check the receiver's response: METHOD 1 Set the receiver to SSB mode. Tune to a quiet frequency (probably somewhere on 10 meters) and sample the band white noise. Make sure that the spectral program is in "Peak-Hold" mode. All frequencies the receiver can hear will be represented in one shot! Look at your spectral program's graphic display to determine the results. It should only require about 10 seconds to get a good sample with this method. METHOD 2 This method will accomplish the same thing but involves more work. I only mention it because I think it's good to know. Set the receiver to LSB. Then tune down to the AM broadcast band between 520kHz ~ 1680kHz and zero-beat the closest AM station you can find. If you have a local AM station, use that one. You will not experience any phasing or fading phenomena with a local signal. Now with the station zero-beated in LSB, set your spectral program for a "Peak-Hold" setting. Slowly tune up frequency so that the AM carrier starts to produce higher pitches. Continue to tune off the carrier about 6 or 7kHz until you cannot hear or see any more tones influencing the spectral graph. Then reverse the VFO tuning and re-sweep the carrier signal going down frequency until you get back to zero-beat. Repeat these sweeps until the spectral graph is no longer responding to the audio energy at any frequency. Whatever method you choose, compare the results with the graph above. Again, there are two things to look at; Frequency Response from the lowest available frequency to the highest available frequency and the Flatness of the response between these frequencies |
|
If after analyzing your receiver, you have determined that it is not as flat at you would like it to see it, you can add a device in the receiver path that can make the audio frequencies more
equal in amplitude throughout the audio passband. The device used for making these frequencies equal to each other is appropriately called, an Equalizer. This device comes in various types and costs. But, for this application, I think
a simple low cost mono 31 band graphic EQ would do the job nicely.
Hookup: There are several ways to connect an equalizer to a receiver. Some methods will produce better results than others. METHOD 1 For simplicity sake, you could just insert the line output of the transceiver straight into the EQ input and then simply plug your headphones right into the EQ. If your EQ has an output level control, you will need to have it quite high. METHOD 2 A better method would be to insert the headphone output of the transceiver into the EQ input and then plug your headphones into the EQ output. With this method, you will have control over the level going into the EQ with your radio's volume control. Most line outputs from transceivers are at a fixed level and not adjustable. The down side to this could be a more restricted frequency response as noted above. However, you should be able to add a bit more EQ influence to compensate for this. METHOD 3 If you have an audio mixer, then you could assign a channel on the mixer to accept the audio output from the transceiver. Then, feed the the EQ to the send/receive loop of that channel via an aux in/out loop or something similar. Then you could plug in your headphones directly to the mixer's main output. METHOD 4 The method I use is without a mixer at all. I send the line output from the transceiver to a stereo amplifier. Then, I use the amplifier's Tape-2 In/Out to loop the EQ into the amp circuit. The output of the EQ goes to the Tape-2 input, and the Tape-2 output connects to the EQ input. Then, on the amplifier, I press the Tape-2 monitor button to monitor the EQ circuit. I can then use my stereo speakers or headphones via the stereo amplifier. Whatever method you use to accomplish EQing of the receiver, the idea is to make it as wide and flat as possible. Adjustment: Setting up the receiver EQ is very straight forward. Using method #1 from the spectral setup above and making sure that the signal coming in to the sound card is after EQing, simply adjust the EQ so that the resulting graph is a relatively straight line from the low to high frequencies. If the receiver is lacking at, say 80Hz, then boost 80Hz on the EQ until it comes up to unity with the midrange. On some receivers, it may need 15dB or more of boost at both 80Hz and at 4kHz. You may even want to cut all of the midrange frequencies by -10dB from about 150Hz ~ 1kHz so that you have more contrast to work with as compared to the low and high frequencies. Just experiment until you find a graph and a sound that you will be comfortable with. |
|
As it is with any experiment, we need a standard reference that is not in constant flux due to our changing whims or subjectivity. It's amazing how our perception can change relative to what we get used to hearing.
For example, if we listened to someone's audio for a half an hour or so that is very tinny, somewhere in that time frame our ears or perception would compensate and get used to the sound. Then if someone with more low frequency content
in their audio broke in, they would, in contrast, sound very Bassy! This phenomena is one of relativism. So which signal would be more appropriate? Is one too Bassy? Or is the other too Tinny? Good question! This is why we need a
listening reference that NEVER changes! |
| John M. Anning - NU9N
e-Mail: |
© 2024 NU9N - All rights reserved
Page updated 06/14/05 Site Design by IcyColors.com |
Apologetics 1 | Apologetics 2 | Audio Glossary | Donate | eSSB Mods | eSSB Ready Rigs | Transmitter Settings for eSSB
File Downloads | News | Radio Connections | Transmitter Settings | Scope Your Audio | Site Map | Site Search | T-Pad Calculator